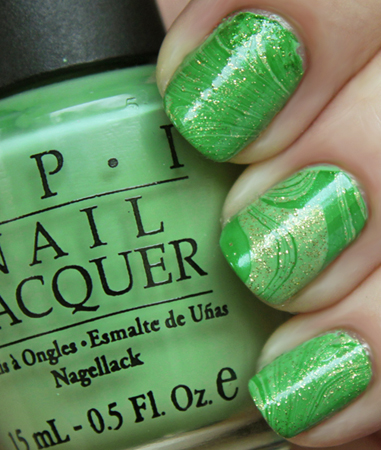
 I should really call this manicure “An Afternoon of Frustration” because that’s how trying to create a water marble manicure left me feeling; FRUSTRATED! Those of you who have mastered the technique, I bow down to you. I honestly have no desire to try this ever again but since I made the effort, I thought I’d share my experience with you. I should really call this manicure “An Afternoon of Frustration” because that’s how trying to create a water marble manicure left me feeling; FRUSTRATED! Those of you who have mastered the technique, I bow down to you. I honestly have no desire to try this ever again but since I made the effort, I thought I’d share my experience with you.I mean its easy to do but i just leaves me annoyed. I don't know why but its one of my Favorite trick that makes you nails look like pro:) Find out more about the water marble technique and my adventure trying to recreate the look after the jump! |
The basic steps of the water marbling process sound easy enough; drop polish in water, create a pattern with a toothpick, dip nail, clean off excess. Simple right? Here’s what you need to get started:
- Cup of room temperature water (filtered or distilled is preferable to tap)
- Toothpick or orange wood stick
- Cuticle oil
- 2-4 bottles of nail polish
STEP 1: Start with your nails painted and dry. Use a base color that will contrast the polishes you are using to create the marble effect. I chose to use a light base color, the minty green OPI Damone Roberts 1968.
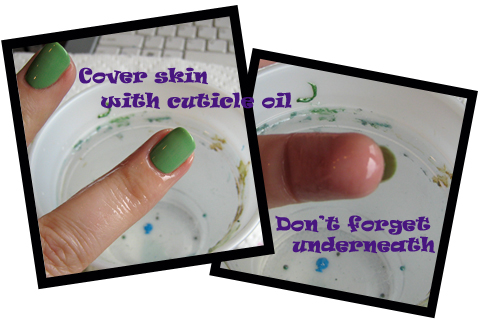
The main issue with water marbling is that you are dipping your fingers into a pool of polish and it gets all over your skin and cuticle. You can take the time to clean it all off but I found a couple great tips on YouTube. CND’s Kristina Baune Estabrooks suggests covering your skin with cuticle oil to prevent the polish from sticking to your skin and SimpleLittlePleasures uses tape to create a polish barrier. I chose to go the cuticle oil route. My skin can always benefit from some extra moisturizing.
STEP 2: Apply cuticle oil to your skin and cuticles all the way down to the top knuckle and don’t forget the underside of your nail.
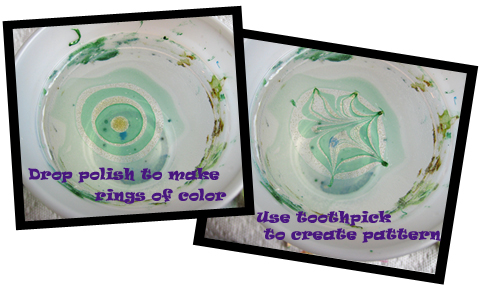
STEP 3: Drop polish onto the surface of the water from about a half an inch away so the polish will disperse. Continue adding drops in alternating colors to create rings of color. Add drops until you achieve the depth of color you desire.
Tip: Not all polish will work well with water marbling so you have to test a few to see which ones disperse the best. I tried OPI Suzi Says Feng Shui and it sank to the bottom of the cup. After a little experimenting I ended up with Sally Hansen Emerald City and China Glaze 5 Golden Rings.
STEP 4: Use a toothpick or orange wood stick to create a pattern in the polish. I’ve seen some people start from the outside but doing that just pulled all the polish into a clump so I started in the middle and worked from there. Again, you have to play to find the method that works best for you. Continue to swirl the polish until you create a pattern you like. If you mess up, just start over.
Tip: To clean the water surface, add one drop of polish and spread it over the surface pulling the color to the edges with your stick. Let it dry for a few seconds and then “clean” the surface by removing the layer of polish with your stick. It will pull up any floating bits of polish in the process. I picked up that trick fromSimpleLittlePleasures.
STEP 5: Dip your nail in the polish right after you finish creating your pattern. If you wait too long the polish will dry. While the nail is submerged, use your stick to pull the excess polish away from your skin. Remove nail from water and shake off excess moisture.
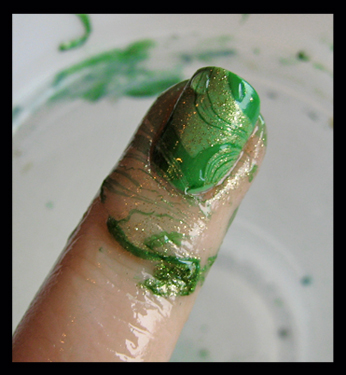
STEP 6: Clean up the cuticle and skin. Thanks to the cuticle oil, the majority of the polish will easily come off using a cotton pad. I used a clean orange wood stick to push the polish off my cuticles, no remover needed. For stubborn bits of polish dip a cotton swab in acetone.
The Finished Product
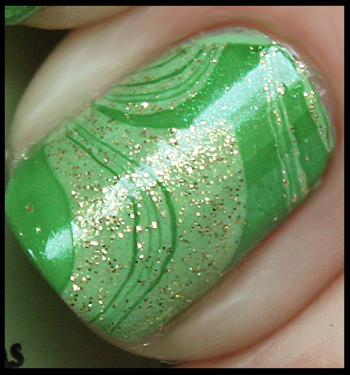

- While the cuticle oil helps with cleanup, it was still a major pain removing up all that excess polish. I went through so many cotton pads and ended up getting polish on my other fingers. I seriously don’t know how people do a full manicure on all 10 nails without losing their shit!
- Trying to draw a pattern that looks good is not easy and as you can tell, I did NOT succeed at it for the most part.
- It’s very easy to accidentally pull the pattern or ding it during cleanup and being a naturally clumsy person, I biffed two nails and had to start over. I even made mistakes on the finished manicure but couldn’t bother to try again.
Now before you call me out for whining, I know that any new skill takes time and practice and I’m sure that the process becomes easier the more you do it. Though in all honesty, with the amount of waste I created just marbling three nails, I have no desire to master this art. I’ll be content with admiring the YouTubers from now on.
I’d love to hear your thoughts on water marble manicures. Who’s tried it? Do you love it? Hate it? Do you have any tips to share?
soure - below :)

OMG! They look awesome, I can't wait to try it!
ReplyDeleteCheck out my blog hope you can follow me too
www.chicmodaglam.blogspot.cm
thanks! Tell me if you do try it
DeleteWow, I love the effect. I'm going to try this sometime. When I do I'll do a post on it.
ReplyDeleteI love when my followers try new things<3 make sure to send me a email to the link if you do try it
DeleteEnter in my giveaway
http://beautyfashionbyme.blogspot.com/2012/02/giveaway-thanks-for-great-followers.html